WiFi Layout Guides eero Mesh WiFi – Whole‑Home Coverage for Maltese Buildings
Thursday, February 05, 2026 by Melita
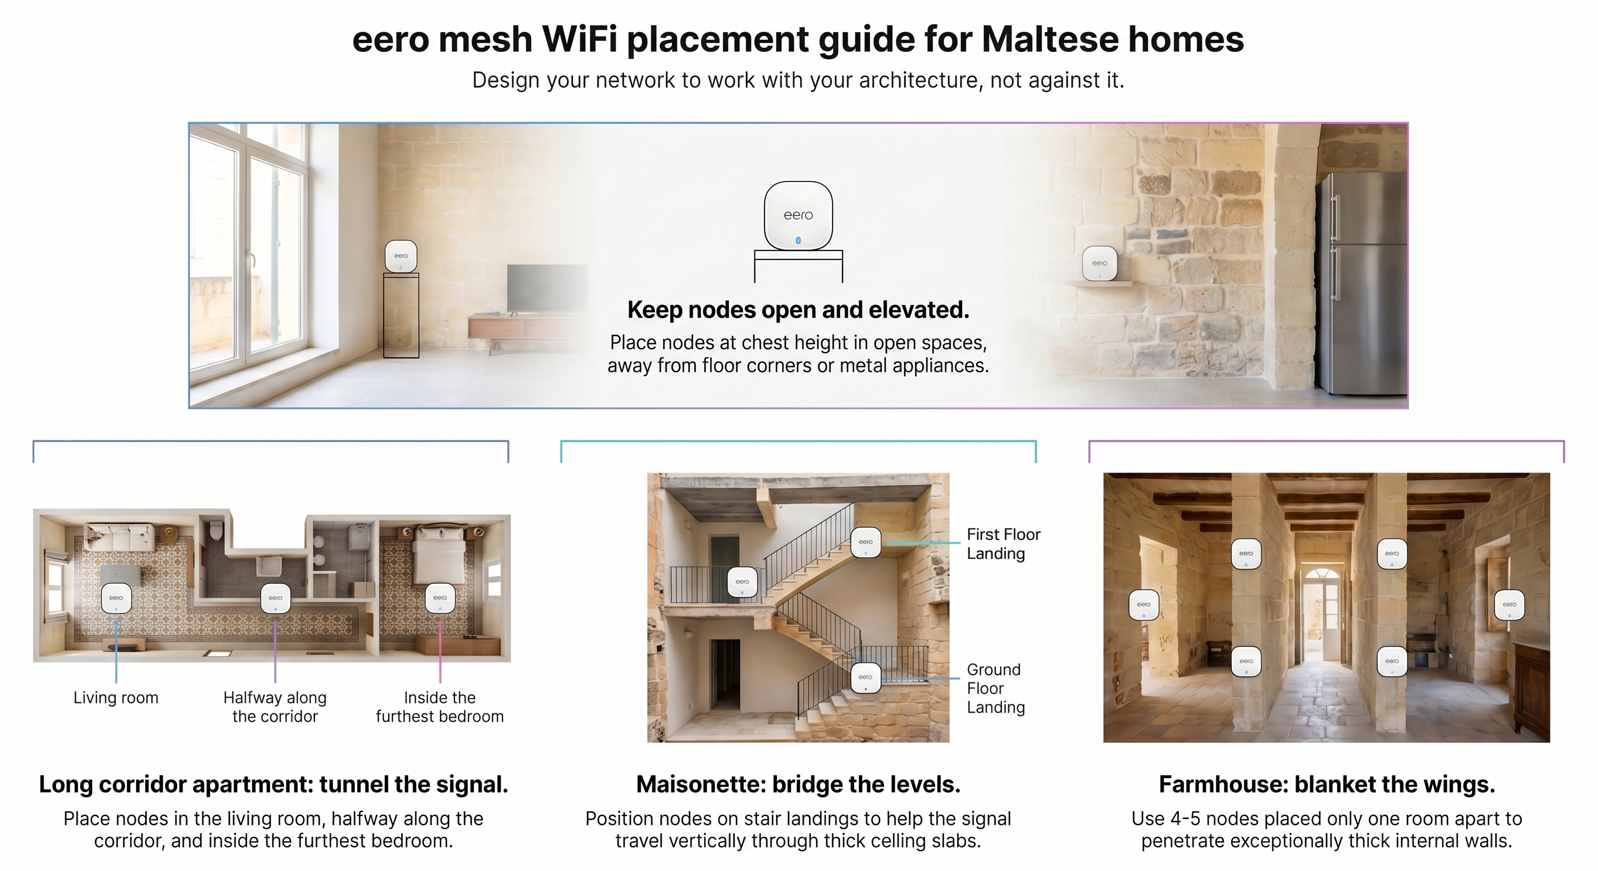
Practical, Malta‑specific placement guides for eero mesh WiFi in terraced houses, apartments, maisonettes, townhouses, and farmhouses.Every Maltese home has its own layout challenges — long corridors, thick limestone walls, staircases, corner rooms, split levels, deep bedrooms, elevated ceilings, or extensions built at different times. Because WiFi doesn’t travel well through limestone, each layout needs a different approach to positioning eero mesh nodes.
This page gives you clear, layout‑specific guidance so you can get fast, stable, consistent WiFi in every room of your home. No guesswork — just proven, Malta‑ready placement strategies.
How to Use These Guides
Find your home type below.
Follow the node placement drawings in words (designed to mimic a diagram).
Apply the dos and don’ts for your structure.
Run a walk‑test to fine‑tune and adjust (details at the end).
Each layout includes:
WiFi behaviour predictions
Typical limestone obstacles
Ideal node placements
Optional Ethernet recommendations
Troubleshooting notes
1) Long Corridor Apartment (Common in Sliema, Gżira, St. Julian’s, older blocks)
Why this layout strugglesLong corridor apartments create a “WiFi tunnel” where the signal must pass through:
A long hallway
Multiple limestone doorframes
Rooms branching off the corridor
This causes rapid signal fade.Ideal eero setup: 3 unitsNode A (Main Gateway): Living room next to router, placed openly (NOT tucked behind TV).Node B: Halfway down the corridor, at chest height, in open view.Node C: Near the bedrooms — ideally in the main bedroom doorway area or desk zone.Tips
Avoid placing Node B inside an alcove or behind a corner.
Keep all corridor doors open when possible.
If the TV is at the far end, wire it via Ethernet or place Node C in the same room.
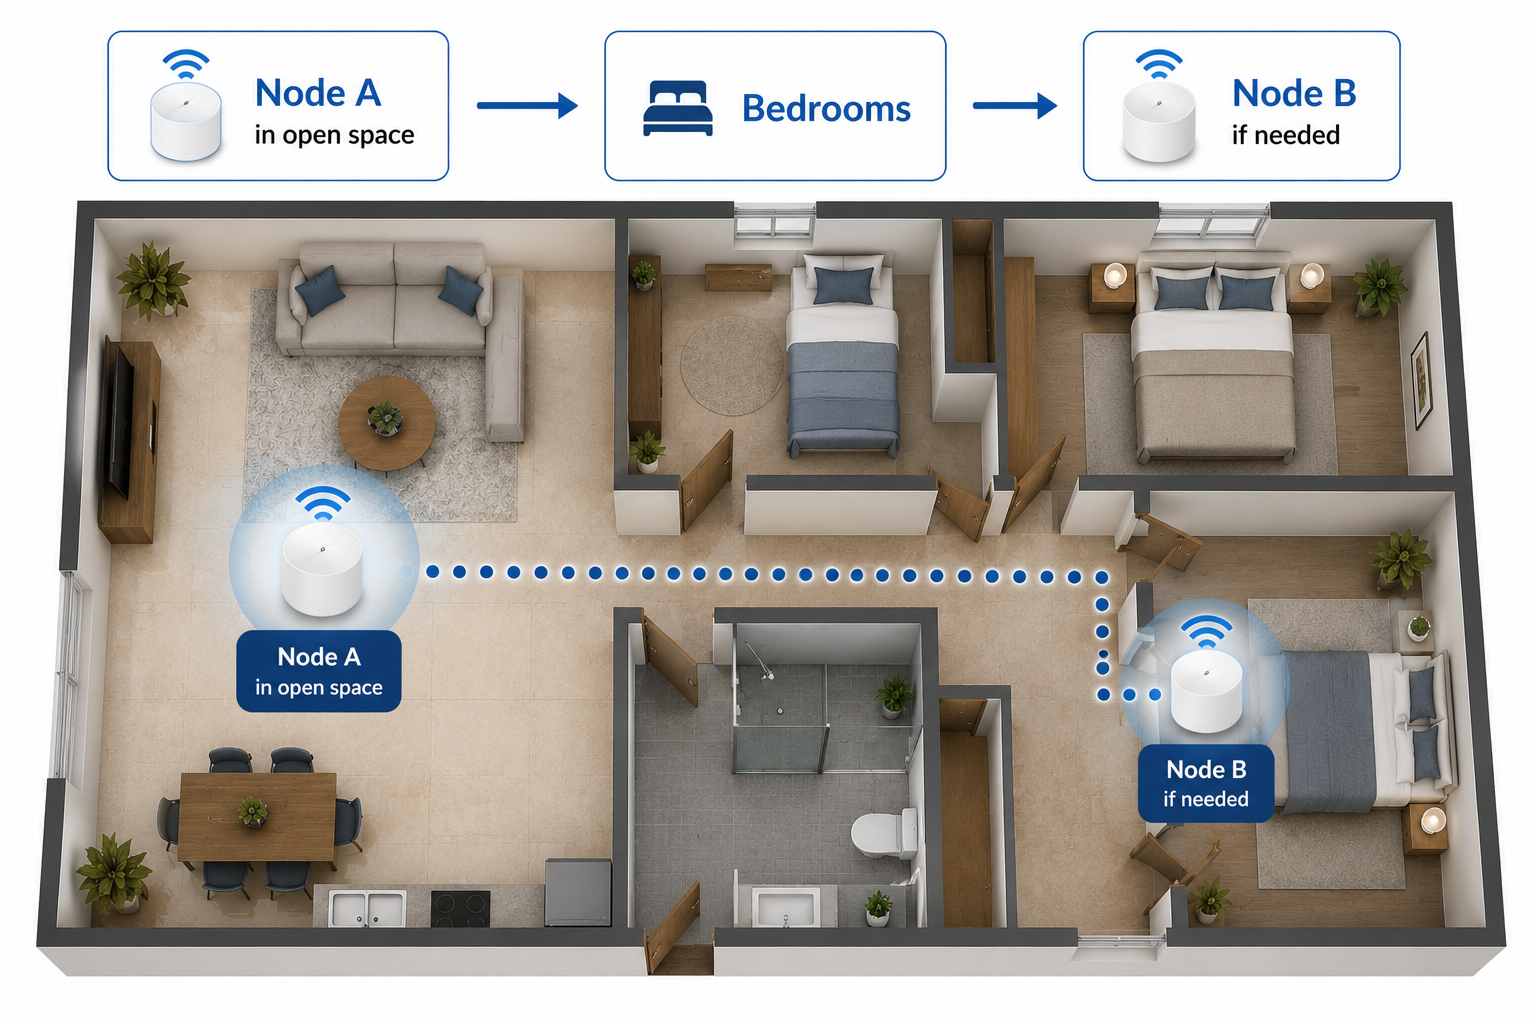
2) Modern Open‑Plan Apartment
Why this layout performs wellOpen living/dining/kitchen spaces allow WiFi to travel freely, with fewer stone walls.Ideal eero setup: 1–2 unitsNode A (Main): Living room, central and elevated.Node B: In hallway near bedrooms if needed.Tips
Kitchens contain metal appliances — avoid placing nodes near fridges or microwaves.
Use one node for the open space; add a second only if bedrooms show drops.
3) Maisonette (Upper or Lower Floor)
Why this is trickyMaisonettes often have:
Split levels
Thick ceiling slabs
Staircases with stone sides
Long layouts with multiple wings
Ideal eero setup: 3 unitsNode A: Living room (router area).Node B: Stair landing (critical).Node C: Bedroom area or office.Text‑as‑diagramGround Floor: [Node A] → (stairs) → [Node B landing] → [Node C bedrooms]Tips
Do NOT place nodes directly on stair steps (too low).
Landing placement improves both floors simultaneously.
If a rear room still struggles, add a 4th node in that specific room.
4) Terraced House
Why this layout needs thoughtTerraced houses are long, narrow, and full of stone partitions.Ideal eero setup: 3 unitsNode A: Front living/dining area.Node B: Middle of house (often kitchen corridor or under the arch).Node C: Bedrooms at the back.Text‑as‑diagram[Front Rooms + Node A] → [Middle + Node B] → [Back Bedrooms + Node C]Tips
Avoid placing Node B inside a boxed‑off kitchen.
Keep Node B slightly out of the kitchen into the corridor instead.
Bedrooms with thick stone should have a node nearby or inside the room.
Why this is one of the hardest layoutsTownhouses typically include:
Narrow staircases
Thick internal walls
Split levels
Rooms deep inside the building
Occasional extensions
Reinforced ceilings
WiFi must travel through many obstacles.Ideal eero setup: 3–4 unitsNode A: Ground floor, front living area.Node B: Stair landing between floors.Node C: First floor bedrooms area.Node D (optional): Study / second floor room.Text‑as‑diagramGround Floor: [Node A]
Stair Landing: [Node B]
First Floor: [Node C]
Second Floor: [Node D optional]Tips
Landing placement is the MOST important part; avoid placing in corner alcoves.
Position nodes so they “see” down the staircase.
Deep stone‑back rooms may need dedicated nodes.
6) Farmhouse / House of Character
Why this layout is extremeFarmhouses usually have:
Very thick limestone walls
Multiple arches and stone beams
Uneven room connections
Extensions added over decades
Large internal courtyards
Single routers fail immediately in this layout.Ideal eero setup: 4–5 unitsNode A: Main living area near router.Node B: Connection arch or central hall.Node C: Bedroom wing.Node D: Kitchen or dining wing.Node E: Upper level or secondary wing.Text‑as‑diagram[Node A] → [Node B central arch] → [Node C bedrooms]
↓
[Node D kitchen]
↓
[Node E upstairs]Tips
Expect nodes to be closer together than usual (1–2 rooms max).
Place nodes in each “wing” of the house.
Wired backhaul is a MAJOR benefit here.
7) Duplex / Split‑Level Apartment
Why this layout is trickySplit‑levels often hide rooms behind floor‑height transitions:
Steps up or down
Platforms
Partial walls
Ideal eero setup: 3 unitsNode A: Main living/kitchen area.Node B: Top or bottom of the split.Node C: Bedroom area.Text‑as‑diagram[Node A] → (step up/down) → [Node B] → [Node C]Tips
Keep nodes on the same level as the rooms they serve.
Avoid placing nodes near steps or under overhangs.
8) Studio or Compact Flat
Why this layout is easyMinimal walls = great WiFi performance.Ideal eero setup: 1 unitNode A: Living area, central.Tips
Add a second node only if the bedroom is behind a stone wall.
9) Placement Mistakes to Avoid (Across All Layouts)
→ Behind TVsStone + metal = huge WiFi losses.→ Inside cupboards or bookcasesWiFi cannot escape effectively.→ On the floorSignal disperses poorly and hits furniture.→ Next to fridges, ovens, or microwavesThese cause interference.→ Too close togetherNodes need spacing to provide coverage.→ Too far apartNodes must still “see” each other.
10) When to Use Ethernet (Optional but Powerful)
Wiring certain devices dramatically improves network performance:
Smart TVs
Gaming consoles
Work PCs/laptops
Home servers/NAS
Room where you host video calls
Ethernet:
gives maximum speed
reduces WiFi congestion
improves stability
enhances mesh backhaul
If running cables isn’t possible, keep nodes in line‑of‑sight as much as possible.
11) Simple Walk‑Test to Perfect Your Layout
Stand 1–2 m from Node A → run a speed test.
Move to Node B → run again.
Move to Node C → compare results.
Identify weak zones → shift nodes 1–2 m and retest.
Test areas behind thick stone or multiple walls.
Test peak hours (evening).
Adjust positions if calls or streaming stutter.
Consistency matters more than top speed.
12) Final Advice
Malta’s limestone isn’t changeable — but your WiFi layout is. By placing eero nodes strategically, keeping them in open spaces, and tailoring your setup to your home’s structure, you can enjoy:
Fast WiFi
Stable connections
Smooth streaming
Reliable work calls
Low‑lag gaming
Smart home performance
Consistent coverage in every room
Just choose the layout that matches your home and follow the placement plan.